
Spring Cherry Blossom Nail Art // Sweet As Mae
August 31, 2015 |
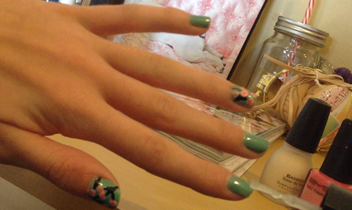
| It's a little difficult to show the full effect on an iPhone camera! I promise you this design looks better in person haha! <3 |
Hey guys :) today I decided to post a little tutorial on a pretty Spring-themed nail art design!
I love nail art! I've been painting my nails like a canvas for as long as I can remember, and I adore trying out new nail art designs. I have seen designs similar to this one everywhere lately, and I have been wanting to try this design out for a while.
I didn't find this design to be very difficult, however this is NOT a design for beginners. The design features some cute cherry blossoms with a few branch-like strokes here and there <3 I decided to only do the full design on my thumb and ring finger, as I thought it added a more sophisticated touch and wasn't too over the top (of course you can paint all ten nails with the full design if you please!). I'm still working on perfecting this design and this is the very first time I tried it. So let's go!
I didn't find this design to be very difficult, however this is NOT a design for beginners. The design features some cute cherry blossoms with a few branch-like strokes here and there <3 I decided to only do the full design on my thumb and ring finger, as I thought it added a more sophisticated touch and wasn't too over the top (of course you can paint all ten nails with the full design if you please!). I'm still working on perfecting this design and this is the very first time I tried it. So let's go!

Requirements:
Base Coat
Base Colour
Black or Brown
Light Pink
Dark Pink
Top Coat
Difficulty level:
Medium - Difficult
Method:
Step 1:
Paint a thin layer of base coat onto your nails. It's super important to paint a base coat onto your nails as it protects your natural nails. Chemicals from the nail varnish can cause your nails to become unhealthy (we do not want this haha!!!). Any base coat will do, there are many variations to suit your specifications, but today I just used a standard base coat by Sinful Colours.

Step 2:
Paint 2-3 layers of your base colour. Minty greens, teals and blues work best for this design, however you can use whatever colour you prefer. Today I used the Sinful Colours Mint Apple polish. It's a beautiful mint green shade with a slight sparkle to it! I painted two layers because the nail polish I used is a little transparent with just one layer.

Step 3:
Paint the branches. Using some form of nail striper draw small black (or brown) lines coming from the edges of the nail and smaller lines 'branching' off it. You may want to practice this skill on a piece of paper first! I used BYS nail polish in the shade Black Satin, and since I do not own a black striper I simply cut down an older nail polish brush to make a nice thin striper. You do not need a proper nail striper to complete this part of the design - you could use a bobby pin to draw many dots then link them together - any form of striper will do!

Step 4:
Paint multiple dots in a light pink or pastel pink shade. To be honest you could use any colour but I wanted to really show that the flowers were cherry blossoms, so I used pink! The pink I used was BYS Prima Ballerina. What you'll want to do is use some sort of dotting tool to draw multiple dots surrounding each other in a circular pattern coming off the branches. I used a proper dotting tool but the end of a pen or even a bobby pin will work well too! Make sure the branches are COMPLETELY dry before you do this step!
 |
| I accidentally took the picture after step 5 - oops! oh well I'm sure you guys get the memo hehe! So to confirm here I have painted both the light pink dots AND the dark pink dots! |
Paint dark pink dots in the middle of the light pink dots. A simple step, all you have to do is draw one big dot in the middle of each circle of light/pastel pink dots! The shade I used was BYS Scented Blossom Pink (This polish is amazing, a beautiful colour AND smells like flowers once dry! Plus it's blossom - perfect for this design!)
Step 6:
Paint a top coat. Please be patient before doing this step! You do not want to smudge your nails (I have done this MANY times and it is an absolute PAIN!), so wait till they are completely dry before applying the top coat! To test their dryness very lightly tap or slide your finger over the nail, and if you see a slight fingerprint or smudge where you touched the nail it is NOT dry yet! Like the base coat their are many variations you can pruchase, but I chose to keep it simple with the BYS Top Coat.
Step 7:
Clean any mistakes. Last but not least, dip a cotton bud into a small portion of nail polish remove and rub onto any nail polish that has got onto your skin. This way your nails will look much cleaner and well manicured :)

Tips and Tricks:
- You can paint as many blossoms on the nail as you please, I didn't want too many but looking back I feel I could have added a few more to my thumb.
- When painting your base colour, try to paint the whole nail in three strokes; One for the left side of the nail, one for the middle, and one for the right side of the nail.
- Try watching some youtube videos, listening to music or even reading some blogs to distract yourself while your nails are drying.
So I hope you guys enjoyed this nail art design, please try it out and comment below if you do and how it went! You can also send me pictures through the comments or wherever else haha! Stay sweet, Mae <3


1 comments
Comment below if you give this nail art or another design similar a go! :)
ReplyDelete